140‐Day QuickBooks Trial Software
Installation Guide
This guide will help you install the 140‐day trial version of QuickBooks that is associated with your textbook. Depending on your textbook, the software may be available via digital download or DVD. This guide includes instructions for installing the software using both methods. Also included are instructions for toggling to the Pro edition of the software, which is necessary for some users. Be sure to check out the Common Questions section at the end of this guide.
Contents |
|
| Note! Your QuickBooks trial software is intended for use on a Windows‐based PC. The | |
software cannot be installed mobile devices using the iOS or Android operating system. |
|
Please see this page for more information on system requirements to install QuickBooks. |
Installing QuickBooks – Digital Download
If your trial version of QuickBooks is provided via digital download, you will access the software from the Intuit website.
Before you get started, make sure you have your license number and product number handy.
15‐digit license number: ___ ___ ___ ___ – ___ ___ ___ ___ – ___ ___ ___ ___ – ___ ___ ___
6‐digit product number: (QuickBooks 2014) 602 – 834 (QuickBooks 2015) 503 – 154
1.Close all running programs, including antivirus programs.
Remember to restart your antivirus program(s) after the software installation is complete.
2.Open a web browser and navigate to http://quickbooks.com/download.
These instructions use Internet Explorer. Different web browsers may behave differently.
3.Click the QuickBooks Accountant link for your version of QuickBooks.
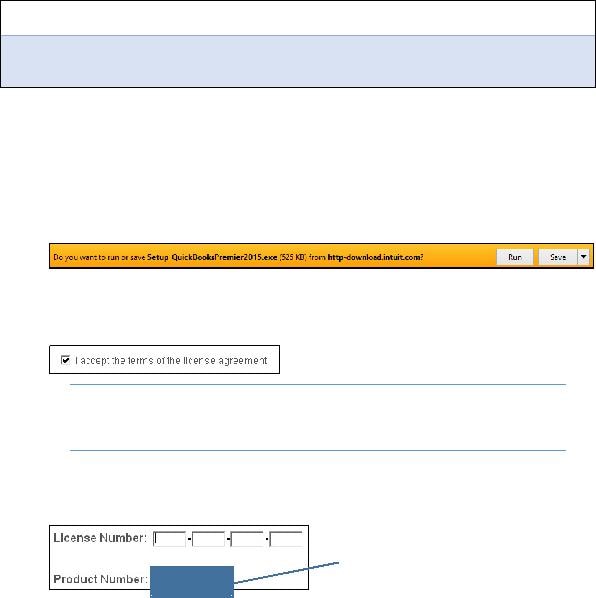
4.Choose the Run option in the download bar, and then choose Yes in the dialog box that appears.
Continue with the next step after the download completes.
5.Click Next in the wizard screen, and then click Next in the Intuit QuickBooks Installer window.
6.Click the checkbox to accept the terms of the license agreement; click Next.
Tip! If desired, use the Print link at the top‐right corner
of the window to print the License Agreement for your records.
7.Ensure that the Express (recommended) installation type is selected; click Next.
The Express installation will place QuickBooks in the default location on your computer.
8.Type your license number and product number in the provided boxes; click Next.
For QuickBooks 2014, use 602‐834.
For QuickBooks 2015, use 503‐153.
9.Click Install.
The installation can take time, so be patient!
10.Click Open QuickBooks in the screen that appears after the installation is complete.
11.If a notice regarding how QuickBooks uses your Internet connection appears, click OK.
The QuickBooks trial software is now installed on your computer.
12.Toggle to the Pro edition of the software, if necessary for your course.
T
Installing QuickBooks – DVD
If your trial version of QuickBooks is provided via DVD, simply follow these steps.
Before you get started, make sure you have your license number and product number handy.
15‐digit license number: ___ ___ ___ ___ – ___ ___ ___ ___ – ___ ___ ___ ___ – ___ ___ ___
6‐digit product number: (QuickBooks 2014) 602 – 834 (QuickBooks 2015) 503 – 154
1.Properly install the installation disc into your computer.
2.Follow the step for your version of Windows:
Windows 7: Click Run setup.exe.
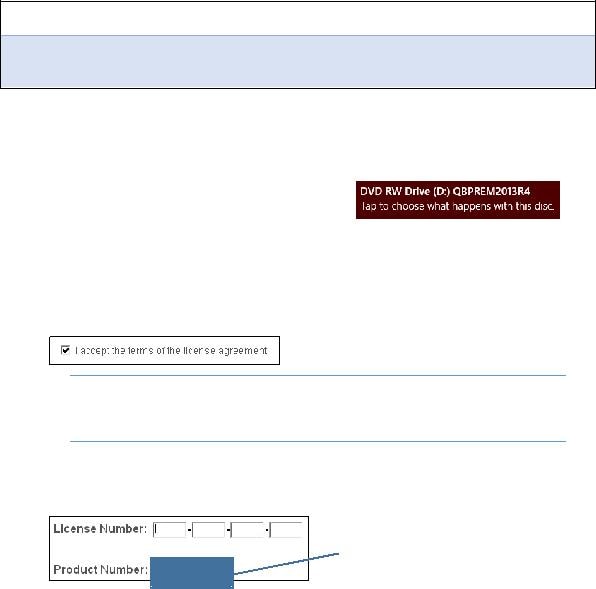
Windows 8.1: Tap the banner that appears at the top‐right corner of the screen and then click Run setup.exe.
3.Click Yes in the User Account Control window.
QuickBooks begins the installation, and the Intuit QuickBooks Installer window will soon display.
4.Click Next in the first screen that appears.
5.Click the checkbox to accept the terms of the license agreement; click Next.
Tip! If desired, use the Print link at the top‐right corner
of the window to print the License Agreement for your records.
6.Ensure that the Express (recommended) installation type is selected; click Next.
The Express installation will place QuickBooks in the default location on your computer.
7.Type your license number and product number in the provided boxes; click Next.
For QuickBooks 2014, use 602‐834.
For QuickBooks 2015, use 503‐153.
8.Click Install.
The installation can take time, so be patient!
9.Click Open QuickBooks in the screen that appears after the installation is complete.
10.If a notice regarding how QuickBooks uses your Internet connection appears, click OK.
The QuickBooks trial software is now installed on your computer.
11.Toggle to the Pro edition of the software, if necessary for your course.
oggle to the Pro Edition
Your trial software of QuickBooks is the Premier Accountant edition. If you are enrolled in a full QuickBooks course using a QuickBooks Pro textbook from Labyrinth Learning, you must align your software version with the textbook.
Note! If you are enrolled in a payroll course using Labyrinth’s Payroll Accounting textbook, you are not required to toggle to the Pro edition.
Before you begin, complete the first Develop Your Skills exercise in your QuickBooks Pro textbook.
1.In QuickBooks, choose File > Toggle to Another Edition.
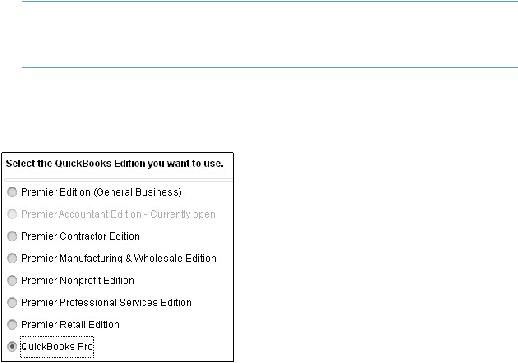
2.Click in the circle to the left of QuickBooks Pro and then click Next.
3.Click Toggle, and then click OK in the Close Accountant Center window.
QuickBooks will close and then reopen in the Pro edition. The title bar will show that you are using the Pro edition “via” the Accountant edition.
Eagle Safes Error Code — Best
The safe has initiated its penalty lockout protocol due to multiple consecutive wrong code entries.
**Q: Why does my safe say "Open" but the door
The locking bolts are jammed, preventing the internal motor from retracting or extending them fully.
Still seeing red lights? Reply with the code you're seeing, and let's troubleshoot! 👇 eagle safes error code
While holding the 9V battery tightly in place to supply temporary power, use your other hand to type your code into the keypad. Once open, change the internal batteries immediately. When to Call a Professional Locksmith
Sometimes, the safe acknowledges your correct code but then fails to open. Here is what you need to know:
The batteries that power the electronic lock are critically low. The lock needs a certain voltage to operate the solenoid and retract the locking bolts. When the battery charge is insufficient, the lock can verify the code (hence the "Good" message) but lacks the power to physically open the safe. The safe has initiated its penalty lockout protocol
Eagle Safes is a well-known brand in the safe industry, offering a range of high-quality safes for residential and commercial use. Like any electronic device, Eagle Safes may occasionally encounter issues, which can be indicated by error codes. Understanding these error codes can help users troubleshoot and resolve problems efficiently.
While not an error code in the traditional sense, a low battery is the most common cause of operational issues with electronic Eagle safes. The safe will typically display a message like on the screen. Additionally, if you hear eight beeps after entering a code, this is a standard audio indicator of a low 9V battery.
An is rarely a death sentence for your vault. In 9 out of 10 cases, the culprit is a $5 battery or a 10-minute time penalty. By understanding the language of your safe—what E-01 versus E-05 means—you transform from a panicked owner into a confident operator. Reply with the code you're seeing, and let's troubleshoot
If your safe is throwing an error code and won't open, follow these universal troubleshooting steps before seeking professional help. Step 1: Replace the Batteries Correctly
Press and hold the "0" button and the START/ENTER button simultaneously for 3 seconds. This will usually deactivate the lockout mode. 5. no con (No Connection)
On many newer Eagle safes (manufactured around 2016 and later), this lockout sequence will stop immediately as soon as the correct code is entered. However, on older models, you must wait the full 3 minutes.
This article details the meanings behind every major Eagle Safe error code, provides sequential troubleshooting steps, and covers essential mechanical lockout solutions. Quick Reference Guide to Eagle Safes Error Codes Error Code / Display Primary Cause Immediate Solution / Err-03 / Error 03 5 consecutive incorrect code entries.
When your safe refuses to open and beeps aggressively, it can be a stressful experience. This comprehensive guide breaks down the common Eagle Safes error codes, what they mean, and how you can resolve them to regain access to your valuables. Understanding Eagle Safe Digital Locks